Posts

A Different Method for AMC

Image
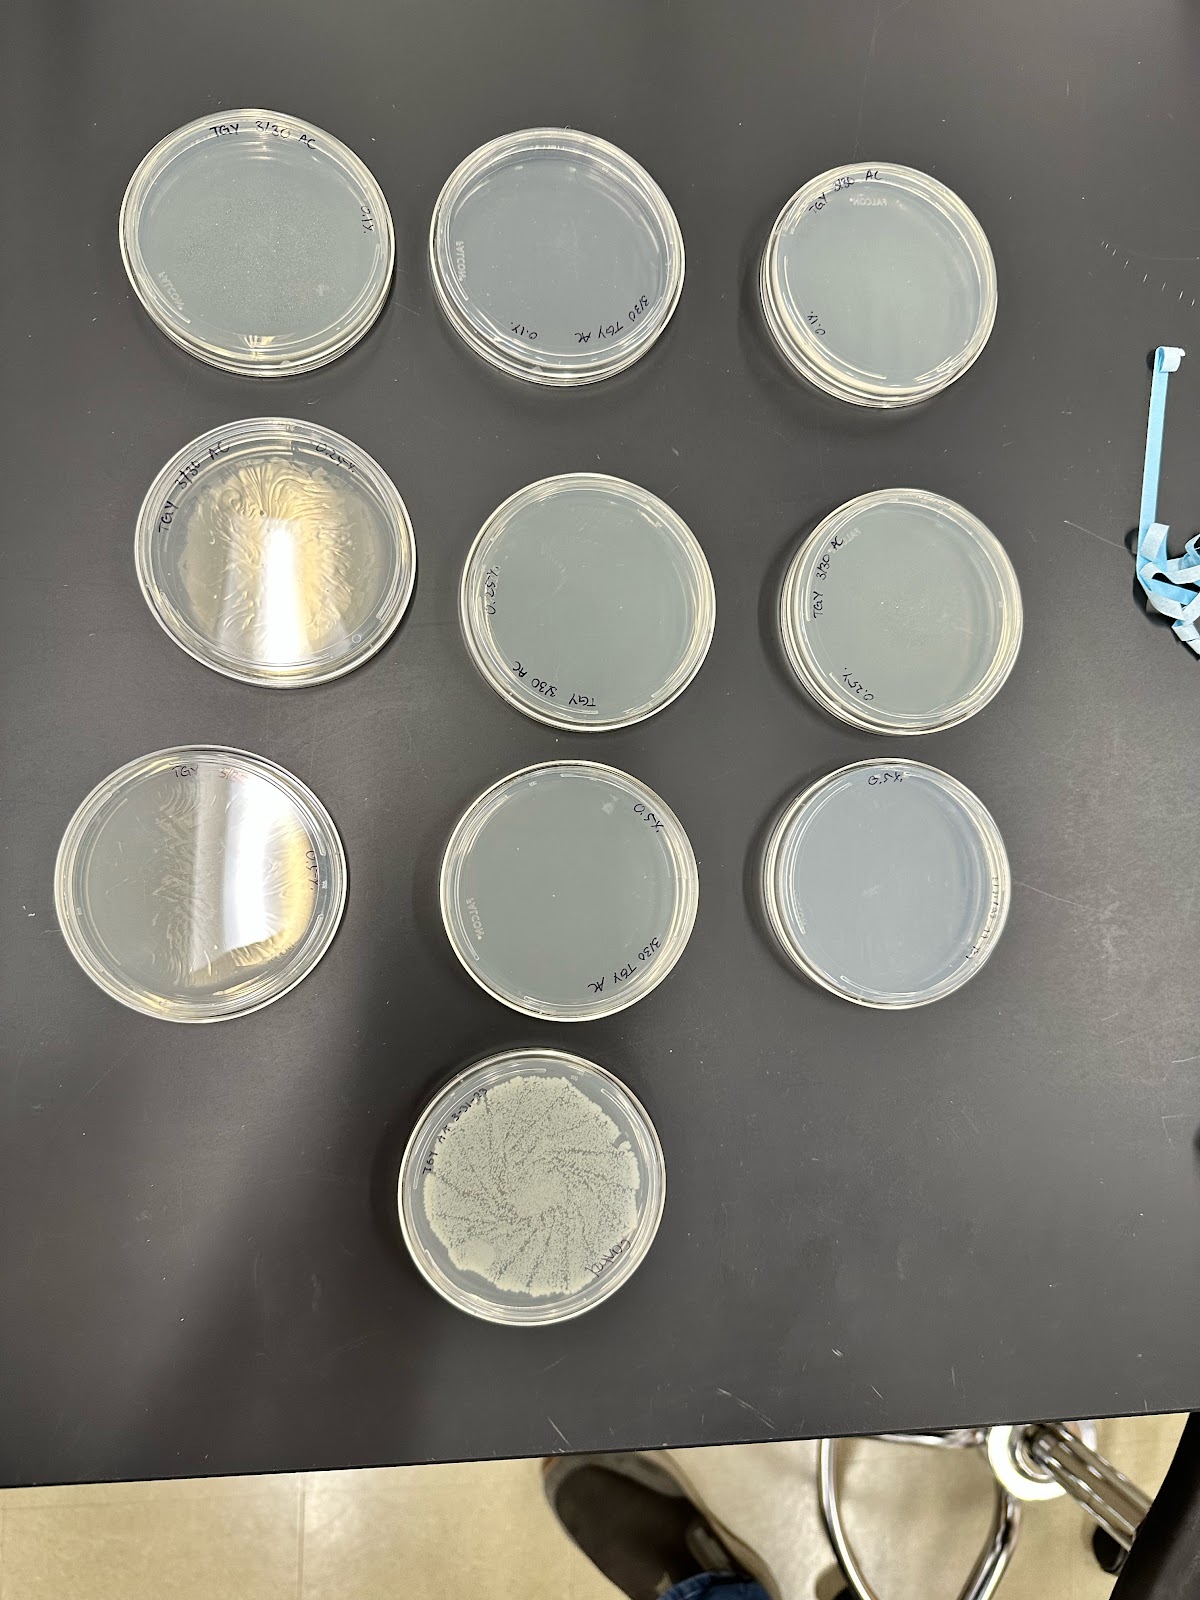
      Throughout this semester, we have been focusing on oxidative stress against the bacteria Deinococcus radiodurans. Due to some very consistent results showing that there was no effect on the bacteria when being exposed to hydrogen peroxide, we decided that we would be focusing on bleach. Bleach has a similar effect on cells so we will be moving forward with that.      First, we started by doing a dilution series of bleach. We started with a stock of household bleach that was at 5.25%. We wanted a large range to start with just to see if there was any growth, the range went from 0.10%, 0.25%, and 0.50% of 5.25%. The bleach was diluted using nuclease free water. The goal amount of cells was an OD600 value of 1. We added 50uL of cells in TGY at an OD of 1 to 450uL of the respective amount of NaOCl (bleach). After combining, the solutions were then incubated at 30 degree Celsius for 30 minutes. After the exposure, we plated in triplicates for our concentra...

qPCR Analysis and One More Attempt

Image
      This week, we discussed how we've been doing our protocol for our AMC oxidative stress project. For this project, we were looking at the expression of the gene Kat A. On our last run, we noticed there was no increase of expression with the gene when exposed to oxidative stress. When reviewing the paper that we've been referencing, we realized that we weren't fully stopping the H2O2 reaction when it was taken out of incubation. This could've cause the affected cells to be killed off completely, showing us no uptick in gene expression for Kat A. We are going to try the experiment one more time by adding catalase to the reaction in hopes of stopping the H2O2 from killing our cells, and instead just stressing them. One other thing we did this week was qPCR analysis. Typically qPCR analysis is done through Excel, but as a hope to understand the math and the meaning behind the numbers, we had a mini lesson on how to do it by hand.     

End to Oxidative Stress

Image
     For the project, we have been doing an experiment on oxidative stress on different genes in the activated methyl cycle in Deinococcus radiodurans . The next genes were going to be Lux S and KAT A but we decided to only to do KAT A, as that would be the first line of defense against H2O2 exposure. If the D. rad  was exposed to the H2O2, we would see an increase of expression of the gene KAT A.      First, we started with growing our cells. The cells were grown for 24 hours in TGY. Once they were done growing, we diluted the samples to an OD value of 1. This time around, it was decided to dilute the samples by tube rather than as a whole. 1 OD600 +/- 0.2     These are the dilutions we ended up with for our samples. The samples were the exposed too H2O2. Instead of having the cells in TGY during the exposure process, we had T1-T3 in 200uL PBS + 200uL H2O2 and C1-C3 in 400uL PBS. The cells were the put in an incubator at 30 de...

Results for PFS Gene Expression When Introduced to Oxidative Stress

Image
     This week in lab, we began with starting over with our experiment. Last week, our RNA results came out very low and dirty, most likely due to improper handling of samples. For this experiment, we are looking to see if the gene PFS in Deinococcus radiodurans is expressing when put under oxidative stress with hydrogen peroxide.       We started growing our samples on Monday for a total of 24 hours of growth. Tuesday, we started the dilution process. We ensured all 6 samples were individually measured for 1 OD600. After diluting our samples, we the introduced 3 of our 200uL of  D. rad.  in TGY samples to 200 uL of 200mM of H2O2 for 30 minutes. Realistically the H2O2 was at 100mM due to it being diluted once it was added to the samples. For our controls, we just added 200uL of TGY for consistency in volume. Once incubation was completed, the cells for all the samples were washed thoroughly with TGY and pelleted for RNA isolation.  ...

Continuing RNA Isolation on Deinococcus Radiodurans When Exposed to Hydrogen Peroxide

Image
     This week in lab, we continued to isolate RNA from D. rad. The difference is we are actually starting the experiment part of our project. Last week we focus on verifying our primers for our reference genes Sec A and GAP 3. It was determined that because Sec A was 105% efficient and GAP 3 was 97% efficient, we were ready to move on with our experiment. The gene that we are targeting is PFS. PFS gene is a gene that encodes for methylthioadenosine/S-adenosylhomocysteine nucleosidase. Its important to the activated methyl cycle. So we are trying to see if oxidative stress to this gene, effects the AMC in any way.      Our first step was to grow cells. We are continuing to grow D. rad for 24 hours but we changed the volume of TGY we are growing it in to 10mL. After 24 hours of growth, we determine that we wanted to do three controls and three tests with a total volume of 200uL of cells at 1.0 OD600. We diluted it by tube and ended up with the following resu...

RNA Isolation and cDNA Synthesis on Deinococcus Radiodurans

Image
                This week in lab, we did RNA isolation on   deinococcus radiodurans.   The reason for doing this is so we could synthesize cDNA. cDNA is a template we are using to study gene expression in   D. rad  when it’s exposed to oxidative stress.   For now, we are doing qPCR for our primers on the gene Sec A to see if it’s a good reference for our experiment.               On Monday,  D. rad  was inoculated into 250mL of TGY media as well as three TGY agar plates. The broth is being used for RNA isolation and the plates for freeze back. On Tuesday, a gram stain was performed on the inoculated TGY media and determined that there was no contamination and RNA isolation was ready to be performed. 3mL of our sample was spun down into a 1mL Eppendorf tube. The process was performed as such:   D. rad  inoculat...

Biotech Bootcamp and Continuing Project

Image
     At the start of this semester, we started with doing a "Biotech Bootcamp." This week of instruction included lab safety, lab protocol, as well as having time to teach/remind students how to pipette and make media/agar. One important protocol we talked about was regarding labeling. We clarified that all media, agar, bacteria, ect. needs to be labeled with the date, contents, initials, volume, concentration, type of bacteria (this is all depending on what the contents are). Labeling also was an issue when it came to waste beakers in the lab. Now all beakers that contain waste must be labeled clarifying whether it was chemical or bacterial waste. We also discussed lab cleanliness. This included washing your hands before and after doing anything in the lab and cleaning off surfaces. Something that was an issue last semester was people leaving powdered media on the scale after measuring, and not wiping things down property. All equipment must be cleaned before and af...

Left, Tetracycline, and Right Overlap Update

Image
       These past couple weeks in lab have been very interesting. First, we decided to give the right fragment of   deinococcus radiodurans   and tetracycline from   E. coli  a try. We are doing this because we haven’t seen much success in adding our right fragment to our left and tet fragments. We initially had isolated more right fragment via gel excision. We had performed two different right isolations. Our ng/μL reading on R 1   isolation was 18.8 ng/μL, and for our R 2   isolation it was 27.7ng/μL. The sample we chose for our overlap reaction was R 2 . We then decided to do an 8-sample overlap heat gradient of right fragment and tetracycline from 35 °C to 60°C. The recipe we used is below:   11μL 7μL 2μL 4μL  Master Mix PCR H 2 0 Right Fragment Tetracycline Fragment             From L to R: 60°C, 57.9°C, 54.6°C, 50.1°C, 44.5°C, 39.6°C, 36.7°C, 35°C   The two best bands we saw were at 57°C...

Continuing Left and Tet Overlap and Introducing a New Project

Image
       Last week in lab we had run our left fragment from   Deinococcus radiodurans,   and our tetracycline fragment from   E. coli.  On a heat gradient from 34 ° C to 54 ° C. This gradient led to our discovery of the ideal temperature for a fragment overlap, that being 54 ° C. With this, we decided to play around and do another gradient. This gradient was from 52 ° C to 70 ° C with a total of 8 reactions. We did have to make more left and tetracycline fragments as we were running low, so we had spent most of our time amplifying those samples and gel excising them. For our overlap reactions, we used the recipe below:   5µL 7µL 11µL 1µL Left Tet Master Mix PCR H 2 O   We ran these 8 samples through PCR in their gradient. We then amplified the samples using the recipe below:   5µL 10.75µL 2.25µL 2µL Overlap Sample Master Mix PCR H 2 O Primer Mix  (A & D)   We then run these 8 samples on a big 1.2% gel for about an hour. ...

34°C to 54°C Gradient on Left and Tet Fragments

Image
This week, we did a PCR overlap heat gradient ranging from 34°C to 54°C on our left fragment of  deinococcus radiodurans  and our tetracyline fragment from  E. coli.  When we ran this reaction on a gel, there was absolutely no DNA showing up. We assumed there was maybe a problem with the pipetting of the fragments into the tubes when they were going through PCR for amplification, and we decided that it would be best to start from the beginning again to ensure that there was no error. We then proceeded to redo the overlap as well as the amplification process at 34°C to 54°C. For these reactions, we made sure they were equal molar. We first had to dilute our samples down to left being 10ng/µL and tet being around 5ng/µL. We did this by getting our original samples and adding PCR water. With our goal of having a 50ng/µL total for left and a 35ng/µL for tet, we loaded the amount below.   5µL 7µL 11µL 1µL Left Tet Master Mix PCR H 2 O   With this ...

Doing Gel Excision on Left, Tet, and Right Fragments After Anna Protocol

     This week, we performed gel excision and extracted our left and right fragments of  deinococcus radiodurans  and our tetracycline fragments from our gel that was run after we did PCR with our Anna protocol. We excised the piece of gel with the DNA. We did this by putting our sample on UV light and cut out our bands. For the next step, we added 3 volumes of our Gel Dissolving Buffer. We did 3 volumes instead of 2 because our gel slices were > 150mg. We then incubated our gel pieces at 55 °C, inverting periodically, for about 10 minutes. After, we inserted a column into a collection tube, loaded the sample, then spun it down, discarding flow through. After, we added DNA wash buffer into our column, spun it down, and repeated once more. For the final steps, we added the column to a clean microfuge tube and added DNA Elution Buffer. We added 10 μL of our Elution Buffer to our sample, then spun it down. After nano dropping our samples, here are...

Attempting Overlap with Anna and Hilgarth Protocol

Image
  For our experiment, we are attempting to combining the left fragments of   deinococcus radiodurans and  and our fragment of tetracycline, taken from E. coli, with our right fragment of   D. rad.  The last time we combined and amplified our fragments, we used the Anna protocol and Hilgarth protocol. On 10/5 we ran a gel on the result of that PCR overlap and amplification and ended up with nothing. No DNA was shown in our samples. We believed that it could be due to bad master mix. For this weeks portion of our project, we focused on doing one slightly different protocol (Reaction  #1) and repeating our Hilgarth protocol (Reaction #2).     For reaction #1 we ran our 2 samples of left, right, and tet. fragments through PCR with primers 1, 4, 5, and 6. The recipe used for our PCR is below: Reaction #1- Total volume: 50µL   11µL Master Mix 2µL DNA 1µL Primer 1 1µL Primer 2 1µL Primer 3 1µL Primer...

How to Make and Load a Gel

    This week in lab, I learned how to make and load a gel. For this blog, I will be discussing the protocol on how to make a 30mL gel. Before starting the process of making my gel, I had to figure out what percent of agarose we should use. For my practice gel, I did 1% agarose (percentage determined by how small or large the DNA is that you're using). For my conversion, I did the following equation: 30mL  *  0.01  *  1000  =  300mg             (percent  (conversion              agarose)    to mg)      I measured 30mL of TAE buffer in a flask a little over twice the volume. I then measured 300mg of agarose on my scale, added it to my buffer, then swirled until cloudy. Before putting my gel solution into the microwave, I made a stopper out of paper towel. After inserting the stopper, I put the solution in the microwave at 30 second increments until i...

DNA Cleanup Protocol on Left and Right Fragments

      This week during lab, we were working on cleaning up left and right fragments. We are cleaning the sample of everything except the DNA that we want. The protocol I learned for this cleanup is as follows: We diluted the left and right samples with the DNA Cleanup Binding Buffer according to a 5:1 ratio recommended for fragments. We then loaded sample into a column that was within a collection tube and spun for 1 min at 13,000 rpm. We then proceeded to discard the flow through. After we re-inserted the column in another collection tube, adding 200µL of DNA Wash Buffer and spun again for 1 minute. We repeated the last step once more before transferring the column into a 1.5µL microfuge tube. Finally we added 10µL of DNA Elution Buffer to our samples, ensuring that its going into the center of the matrix. Then, we waited for 1 minute before proceeding to spin it for another 1 minute at 13,000 rpm. After our first elution cycle, we put the samples on the nano drop, the r...

Completing a Gram Stain on Deinococcus radiodurans in MHA Media

Image
    This week during lab we completed a gram stain on Deinococcus radiodurans after it was grown in MHA (mueller-hinton) media. Deinococcus radiodurans is an extremophile bacteria that we are growing in our lab. We are trying to grow  Deinococcus radiodurans  for 24 hours, in a media that we've never had in before, to see if it's successful.       To complete my gram stain, I first started by drawing a wax circle on my slide for and an indicator in the top right corner, to ensure my slide wouldn't be upside down at any time. I then ignited my Bunsen burner then sterilized my loop with the flame. After allowing the loop to cool, I unscrewed my tube containing the  D. rad  in MHA media, ran the top of the tube over the flame, collected my culture, ran the mouth of my tube over the flame once again, before finally screwing my tube shut. After closing tube, I smeared my culture within the wax circle on my slide. I waited about 2 minut...